Move bluestacks logs to ramdisk


  BlueStacks log 對一般使用者沒什麼用,但會一直產生寫到硬碟裡,消耗SSD的寫入次數,
因為找不到關掉的方法,只好把它導到 RamDisk 裡。

junction 是個有趣的功能,可以讓目錄連結到不同的磁碟空間去。

下載 junction
http://technet.microsoft.com/en-us/sysinternals/bb896768.aspx
放到  C:\ProgramData\BlueStacks

從命令提示字元執行以下指令

cd C:\ProgramData\BlueStacks
sc stop BstHdDrv
rmdir /s /q Logs
rmdir /s /q UserData\Logs
junction.exe Logs Z:\TEMP
junction.exe UserData\Logs Z:\TEMP
sc start BstHdDrv


執行範例:

神魔之塔查看掉落

need root

用任一文字編輯器
https://play.google.com/store/apps/details?id=com.jecelyin.editor&hl=zh_TW
將下面 script 內容存成 loot.sh

---------------------------------------
#!/system/bin/sh
cat /data/data/com.madhead.tos.zh/shared_prefs/com.madhead.tos.zh.xml | grep FLOOR_WAVES | sed 's/\"//g; s/,[A-Za-z]*:0//g; s/,[A-Za-z]*:null//g; s/cardId:0,//g; ' | sed 's/alert/\nalert/;s/.*\n//; s/alert:false,enemies:/\n\n/g; s/lootItem:/\nlootItem:/g' | sed 's/},{$//g; s/}]<\/string>//g'
---------------------------------------

使用終端機
https://play.google.com/store/apps/details?id=jackpal.androidterm&hl=zh_TW

執行
su
sh loot.sh

結果範例:

u0_a122@android:/data/kinmenalex # sh loot.sh

[{monsterId:80,level:17,
lootItem:{type:monster,card:{monsterId:80,level:2}}},{monsterId:60,level:17}]

[{monsterId:80,level:17},{monsterId:60,level:17,
lootItem:{type:monster,card:{monsterId:60,level:2}}},{monsterId:248,level:17}]

[{monsterId:60,level:17},{monsterId:60,level:17},{monsterId:80,level:17},{monsterId:60,level:17,
lootItem:{type:monster,card:{monsterId:60,level:2}}}]

[{monsterId:60,level:17},{monsterId:60,level:17},{monsterId:60,level:17,
lootItem:{type:monster,card:{monsterId:60,level:2}}},{monsterId:80,level:17}]

[{monsterId:70,level:17},{monsterId:70,level:17},{monsterId:80,level:17,
lootItem:{type:monster,card:{monsterId:80,level:2}}},{monsterId:80,level:17}]

[{monsterId:70,level:17},{monsterId:60,level:17},{monsterId:70,level:17},{monsterId:70,level:17}]

[{monsterId:47,level:28,
lootItem:{type:money,amount:1000}}]

VirtualBox 設定螢幕解析度

在裝了 Guest Additions 之後,預設 guest 無法設超過 host 的螢幕解析度,
可以用下面的指令更改

VBoxManage setextradata global GUI/MaxGuestResolution any
VBoxManage controlvm "guest" setvideomodehint "1680" "1050" "32"


Reference:
Configuring the maximum resolution of guests when using the graphical frontend


ssh auto login

ssh 免密碼登入

使用 putty 完整包 http://the.earth.li/~sgtatham/putty/latest/x86/putty.zip

1. PUTTYGEN.EXE Generate Key


public@MyServer:~$ mkdir .ssh
public@MyServer:~$ cd .ssh
public@MyServer:~/.ssh$ vim authorized_keys
public@MyServer:~/.ssh$ chmod 600 authorized_keys


2. Putty Configuration Session Auto-login username
建立一個 Putty Session,並設定 Auto-login username


3. PAGEANT.EXE add Key
建立 PAGEANT.EXE 捷徑,並把 Key 加入參數


之後就可執行 PAGEANT.EXE 捷徑,然後使用 PAGEANT 來登入。

參考:ssh 免密碼

在 Ubuntu USB 開機隨身碟加入再生龍 Clonezilla

Add Clonezilla to Ubuntu USB startup disk

1. 製作一個 Ubuntu USB 開機隨身碟。
http://www.pendrivelinux.com/creating-an-ubuntu-live-usb-from-cd/

2. 下載 Clonezilla zip 檔
http://clonezilla.nchc.org.tw/clonezilla-live/download/sourceforge/

3. 建立 /cloneusb/686/ 目錄,將 Clonezilla zip 解開到裡面,
注意 live/ 目錄要存在 /cloneusb/686/live/ 這個位置。

4. 編輯 /syslinux/txt.cfg, 加入以下內容

#-----------------------------------------------------------
label clonezilla-live-1.2.9-19-i686-pae
MENU LABEL clonezilla-live-1.2.9-19-i686-pae (To RAM)
kernel /cloneusb/686/live/vmlinuz
append initrd=/cloneusb/686/live/initrd.img boot=live config noswap nolocales edd=on live-media-path=/cloneusb/686/live/ nomodeset noprompt ocs_live_run="ocs-live-general" ocs_live_extra_param="" ocs_live_keymap="NONE" ocs_live_batch="no" ocs_lang="zh_TW.UTF-8" vga=788 toram=filesystem.squashfs ip=frommedia nosplash
#-----------------------------------------------------------

5. 完成,在 USB 開機時任按一鍵啟動選單。

=================================================================================
放到已安裝好 Ubuntu 的硬碟中執行也可以
Add clonezilla to grub menu

1. 安裝一份 Ubuntu

2. 下載 Clonezilla zip 檔

3. 建立 /clonehd/686/ 目錄,將 Clonezilla zip 解開到裡面,

4. 編輯 /etc/grub.d/40_custom, 加入以下內容

#-----------------------------------------------------------
menuentry "clonezilla-live-1.2.9-19-i686 (To RAM)" {
search --set -f /clonehd/686/live/vmlinuz
linux /clonehd/686/live/vmlinuz boot=live config noswap nolocales edd=on live-media-path=/clonehd/686/live/ nomodeset noprompt ocs_live_run="ocs-live-general" ocs_live_extra_param="" ocs_live_keymap="NONE" ocs_live_batch="no" ocs_lang="zh_TW.UTF-8" vga=788 toram=filesystem.squashfs ip=frommedia nosplash
initrd /clonehd/686/live/initrd.img
}
#-----------------------------------------------------------

5. 然後作 sudo update-grub 完成,在開機時由選單啟動。

Windows 7 Firefox ClearType rendering mode

一直覺得 Windows 7 下 ClearType 再怎麼調,Firefox 的字都糊糊的,
找了很久,終於看到 Firefox 6.0 有我想要的解法。

以下測試為先用 Windows 7 控制台調整好 ClearType
(控制台\所有控制台項目\顯示\調整 ClearType 文字)

然後在 Firefox about:config 篩選條件:cleartype

然後只改 rendering_mode 的值
gfx.font_rendering.cleartype_params.rendering_mode

0 = Default, 1 = Aliased, 2 = GDI Classic, 3 = GDI Natural,
4 = Natural, 5 = Natural Symmetric

個人覺得 2 或 3 最好看, Y方向的像素不會糊。


rendering_mode = 0


rendering_mode = 1


Silicon-Power 廣穎電通 Blaze B10 16G USB3.0 速度測試

Silicon-Power 廣穎電通 Blaze B10 16G USB3.0 烈燄碟

先說明這是抱怨文
跟人團購買了這一支 USB3.0 的隨身碟,而且之前有看同事用過。
買回當然要先測一下速度,插入電腦,看一下磁碟機內容,
(圖是裝了東西後才抓的,但總容量不變)

疑!容量不太對,仔細算一下,這是一支 16G 的隨身碟所以

16,000,000,000 / (1024*1024*1024) = 14.9G 而不是 14.4G

整整少了 500M,這也偷太多了吧,再看一下同事之前買的為什麼他的就是 15.4G,
前後差了 1G。

同一批共買了3支,結果每支的大小居然可以不一樣,甚至還更少的 XD


寄了下封信給廣穎電通以及打電話到客服尋問結果, 得到以下說明:

--------------------------------------------------------------
在8/1號前後出貨的為不同的產品, 新的產品有挪用部份空間來做
隨身碟保護動作, 以期能延長壽命, 所以看到的會比理論值14.88GB
再少一些。
如果無法接受, 可以為我們進入消費者訴訟。
--------------------------------------------------------------

對,如果以後 flash 的壽命更差,所以決定拿一半的空間來作保護,
那買了標示為 16G 的隨身碟但只能用 8G 那也是正常的。 凸

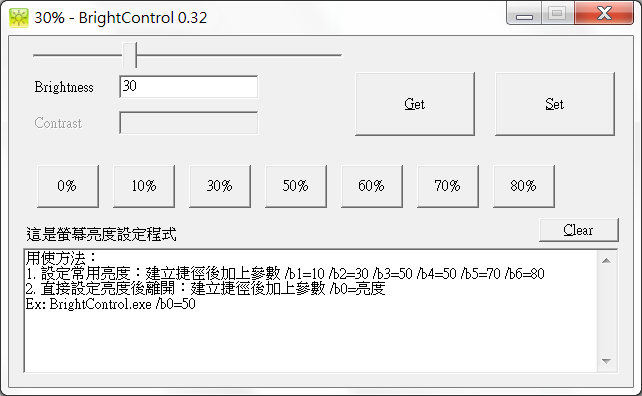
螢幕亮度設定程式 BrightControl

    看影片時候要把螢幕調到最亮,可是瀏覽網頁這種亮度又太刺眼,如果你經常要配合不同的應用調整螢幕亮度,而你的螢幕又不是EIZO的話,那這個程式可以幫你做到單鍵調整螢幕亮度,省去按螢幕OSD調整亮度的麻煩。


下載: MFC Static Library 版本 BrightControl.zip 
3231542282B33385960CB6B95F6A0056 

Share Library 版本 BrightControl0.32.zip  
E9A45AC37C028403D23748F0D63DAAE6 

如果你要自己寫一個的話,以下是參考資料及程式片段,我是用VS2008兜出來的。 
SetMonitorBrightness Dxva2.lib // Minimum supported client Windows Vista 
它應該是用 DDC 來控制螢幕的,不過這些 API 只有在 Vista 以上提供,我自己是在Windows7上使用。 

#include<HighLevelMonitorConfigurationAPI.h>

int CMonConfDlg::SetMonitorBright(HWND hWnd , DWORD cBrightness)
{
HMONITOR hMonitor = NULL;
DWORD cPhysicalMonitors;
DWORD minb=0;
DWORD curb=0;
DWORD maxb=0;
LPPHYSICAL_MONITOR pPhysicalMonitors = NULL;
// Get the monitor handle.
hMonitor = MonitorFromWindow(hWnd, MONITOR_DEFAULTTOPRIMARY);

// Get the number of physical monitors.
BOOL bSuccess = GetNumberOfPhysicalMonitorsFromHMONITOR(
hMonitor, &cPhysicalMonitors);

if (bSuccess)
{
// Allocate the array of PHYSICAL_MONITOR structures.
pPhysicalMonitors = (LPPHYSICAL_MONITOR)malloc(
cPhysicalMonitors* sizeof(PHYSICAL_MONITOR));
if (pPhysicalMonitors != NULL)
{
// Get the array.
bSuccess = GetPhysicalMonitorsFromHMONITOR(hMonitor, cPhysicalMonitors, pPhysicalMonitors);

int n = 0;
do {
bSuccess = GetMonitorBrightness(pPhysicalMonitors->hPhysicalMonitor , &minb, &curb, &maxb);
if( !bSuccess ) {
dbg_printf("GetMonitorBrightness, n = %d, bSuccess = %d\r\r\n", n, bSuccess);
        GetErrorMessage(TEXT("GetMonitorBrightness"));
Sleep(RETRY_SLEEP);
}
n++;
} while( !bSuccess && n < MAX_RETRY);

if( bSuccess ) {
if( curb != cBrightness && minb <= cBrightness && cBrightness <= maxb ) {
int n = 0;
do {
bSuccess = SetMonitorBrightness(pPhysicalMonitors->hPhysicalMonitor , cBrightness);
if( !bSuccess ) {
dbg_printf("SetMonitorBrightness, n = %d, bSuccess = %d\r\r\n", n, bSuccess);
        GetErrorMessage(TEXT("SetMonitorBrightness"));
Sleep(RETRY_SLEEP);
}
n++;
} while( !bSuccess && n < MAX_RETRY);
dbg_printf("SetMonitorBrightness(%d), bSuccess = %d\r\r\n",cBrightness, bSuccess);
}
}

// Close the monitor handles.
        bSuccess = DestroyPhysicalMonitors( cPhysicalMonitors, pPhysicalMonitors);
// Free the array.
free(pPhysicalMonitors);
}
}
return curb;
}

我買到的 GA-880GMA-UD2H

20101011
在欣亞組的新電腦

中央處理器 AMD Athlon II X4-640四核心/3.0GHz/95W/45nm/512KB*4
主機板 技嘉 GA-880GMA-UD2H AMD880G+SB850/4*DDR3/USB3.0
記憶體 Kingston 金士頓 DDR3-1333 2GB (代理商盒裝) *2
內接式硬碟 Hitachi 1TB 3.5吋 SATAII 硬碟
電源供應器 全漢 藍晶鑽 II 400W 80+/PFC/日系電容/12cm溫控風扇/五年保

Dropbox 雲端硬碟

Dropbox 可以用來作不同電腦間的檔案分享及同步,Ubuntu 也可以用,而且使用很方便,不同帳號間可以透過分享資料夾來傳遞檔案,可以試用看看。

邀請連結
http://www.dropbox.com/referrals/NTEyMjE4MTQyOQ

設定好後邀請別人彼此可增加 250MB 空間 ( 最多可加到 8G )不過邀請和被邀請的人不可以在同一台電腦上,要用兩台電腦或虛擬電腦來玩。

--
如何增加 Dropbox 空間到 10G (2 + 8)

1. 使用 VirtualBox + Ubuntu Live CD 開機
2. 用裡面的 Firefox 開啟邀請的連結然後建立新帳號 (帳號用的 email 可以不是真實的)
3. 下載 Dropbox client 並安裝,然後用剛開的帳號進入 (這時邀請的人應該收到容量增加的通知了)
4. 關機,然後更改 VirtualBox 設定值--> 網路 --> 進階 --> Mac 位址 。

重複以上步驟,每次可增加 250M enjoy :)

(好像攻項會被檢查,所以不要加滿所有的名額,還有一天不要加太多個)
--

看來 Dropbox 有用 hash 值來管理所有人的檔案,當你要上傳的檔案曾經有人上傳到 Dropbox 過,同步就會立即完成,因為不須要上傳就可以得到一模一樣的檔案,這對分享熱門檔案來說真是方便。

--
容量加倍,擁有學網 .edu帳號 email 的人可以在下面送出認證的信,
https://www.dropbox.com/edu
所有邀請貢獻變 500MB ,上限變 16G
--

VirtualBox SATA Driver

VirtualBox 安裝 Windows XP 新增 SATA 控制器後 ,
XP 出現 問號 PCI Device

查看 Ubuntu 的 hardinfo 得知硬體為
SATA controller
Intel Corporation 82801HBM/HEM (ICH8M/ICH8M-E) SATA AHCI Controller (rev 02) (prog-if 01)
但去 Intel 網站找了好久找不到,最後在 lenvo 的網站找到這個

Intel Matrix Storage Manager Driver for Windows 7 (32-bit), Vista
(32-bit) and XP (32-bit) - ThinkPad

http://www-307.ibm.com/pc/support/site.wss/migr-70477.html

This package installs the Storage driver to enable the following SATA
Storage Controller on the system board:
- Intel 82801GBM SATA AHCI Controller
- Intel 82801HEM/HBM SATA AHCI Controller
- Intel ICH9M-E/M SATA AHCI Controller
- Intel ICH8M-E/ICH9M-E/M SATA RAID Controller

6iim10ww.exe
471,688
Intel Matrix Storage Manager Driver

下載執行後得到 Driver,然後再用裝置管理員更新即可。
備份

Ubuntu NAT server 單張網卡設定

利用 Ubuntu 架設 NAT,分享給多台PC上網
#-----------------------------------
PC 端網卡設定
192.168.165.xx
255.255.255.0
192.168.165.254
DNS
168.95.1.1

#-----------------------------------

Ubuntu NAT server 架設

1. 安裝 Ubuntu Server
http://www.virtualbox.org/
http://releases.ubuntu.com/lucid/ubuntu-10.04-server-i386.iso
# 用VM安裝的 RAM 192MB 即可,安裝好後把虛擬網卡從 NAT mode 改成 Bridge mode

2. 設定 IP

sudo -i
vim /etc/network/interfaces
#--------------------------------------------------------------
# The primary network interface
auto eth0
iface eth0 inet dhcp

auto eth0:1
iface eth0:1 inet static
address 192.168.165.254
netmask 255.255.255.0

#--------------------------------------------------------------
/etc/init.d/networking restart

3. 設定 NAT

echo "1" > /proc/sys/net/ipv4/ip_forward
iptables -t nat -A POSTROUTING -s 192.168.165.0/24 ! -d 192.168.165.0/24 -j MASQUERADE

# 可以把上面兩行放到 /etc/rc.local 開機的時候執行。

#--------------------------------------------------------------
#nat 查看的指令
iptables -t nat -L -n
iptables -t nat -L -nv

完成

sfdisk 備份磁碟分割表

注意:請先參考 man page 知道你在作什麼之後才進行操作。
http://linux.die.net/man/8/sfdisk

備份磁碟分割表到 sdb.pt.sf
sudo sfdisk -d /dev/sdb > sdb.pt.sf

還原(通常是在不小心把磁碟分割弄不見的時候才需要它,請謹慎使用)
sudo sfdisk -O sdb_sectors.backup -f /dev/sdb < sdb.pt.sf

-O filename : 把操作過程中所動到磁區存到檔案去,
如果不小心發現做錯了,還可用 -I filename 來復原
sudo sfdisk -I sdb_sectors.backup /dev/sdb

在 VirtualBox 中使用 USB 裝置

在 VirtualBox 中使用 USB 裝置


// 移除 OSE 版本
sudo apt-get remove virtualbox-ose

// 下載 Ubuntu 所對應的 VirtualBox 版本(有分 i386 與 x86_64),然後安裝
http://www.virtualbox.org/wiki/Linux_Downloads

// 把使用者加到vboxusers群組
系統-->管理-->使用者及群組-->管理群組,接下來在視窗裡找到vboxusers這個群組,再選擇屬性,把自已打勾加入即可。做好之後要登出再登入,這樣設定的群組才會生效。

Make a grub2 bootcd in Ubuntu 10.04

// Make a grub2 boot cd in Ubuntu 10.04

mkdir grub2boot
cd grub2boot/
mkdir bootcd
cp -r /boot/ bootcd/

// Edit grub2 boot menu
chmod +w bootcd/boot/grub/grub.cfg
gedit bootcd/boot/grub/grub.cfg

grub-mkimage -o core.img biosdisk iso9660 part_msdos fat ntfs ext2
cat /usr/lib/grub/i386-pc/cdboot.img core.img > bootcd/boot/grub/torito.img

mkisofs -R -b boot/grub/torito.img -no-emul-boot -boot-load-size 4 -boot-info-table -o grub2.iso bootcd

// Done, burn or test your bootcd

利用 FastCopy 作備份軟體,備份到外接硬碟

FastCopy 是一個好用的快速檔案拷貝工具,尤其是在同一台硬碟的不同分割區搬檔案時,更可見它快速的優點。另一個特點是在它在複製或搬移後能夠保留原本目錄的日期及時間,作到完全的複製,這是原來Windows的拷貝作不到的。

今天要利用它的另一個功能 Sync 來當作備份軟體,作日常的備份之用。

由此下載懶人包
FastCopy1.99r4_FastBak.rar
MD5: F995067AFCA4FE2602F829EE24EFAE05

參考原網站的參數說明寫了兩個批次檔
-------------------------------------------------------------------------
# fastbak.bat
FastCopy\fastcopy.exe /cmd=sync /syncdeltoarchive /auto_close %2 /to=%1\

# FastBak_ALL.bat
rem call fastbak.bat Dest_Dir Source_Dir

call fastbak.bat 250C C:\Downloads
FastCopy\fastcopy.exe /cmd=sync /exclude="NTUSER.*;UsrClass.*;*.tmp;Temp\;Temporary Internet Files\;" /auto_close "C:\Documents and Settings" /to=250C\

call fastbak.bat 250D D:\Photo
call fastbak.bat 250D D:\Mail
-------------------------------------------------------------------------

FastCopy 放到隨身碟或外接硬碟的 FastCopy\ 下,
兩個批次檔與 FastCopy\ 目 錄在同一層,


編輯 FastBak_ALL.bat 把想要備份的目錄都寫上去。
以後只要執行 FastBak_ALL.bat 就可以把檔案備份到外接硬碟去,每次執行時 FastCopy 只會複製有差異的檔案,所以在第二次以後的拷貝速度都非常快,非常適合重要檔案的日常備份之用。
(Documents and Settings 那一行因為要排除一些檔案所以直接展開寫上去,如果你沒有要備份直接刪除即可)


PS. 懶人包裡的版本是我自已Build的,加上了這個參數
/syncdeltoarchive
在 sync mode 時,當 Dest_dir 裡的檔案要被刪除或是覆寫時會把檔案移到 "Dest_dir - Archive" 這個目錄裡,這樣可以用來保留前一個版本的檔案,或是用來檢視那些檔案在上次備份之後是有變動的。如果你使用官方版的 FastCopy 請把批次檔裡的這個參數刪掉。

source

grub2 save default entry

在 grub2 開機選單中,如果要記住上次開機的 OS

編輯 /etc/default/grub
lucid:~$ sudo gedit /etc/default/grub
# 把 default 變成 saved
GRUB_DEFAULT="saved"
# 然後加入這一行,打開儲存選項
GRUB_SAVEDEFAULT=true

# 最後更新 grub
lucid:~$ sudo update-grub

# 完成。以後開機時就能以前一次選擇的作業系統作為預設值。

利用 Grub2 在硬碟中測試 Ubuntu 10.04 iso 檔

如果你已安裝了 9.10 ,在正式安裝之前,想搶先看看 10.04 的新功能,除了用
VM、usb 開機、網路開機、燒光碟之外,還可以直接用 iso 檔案來開機。

1. 編輯 /etc/grub.d/40_customer
sudo sudo gedit /etc/grub.d/40_customer

2. 加入 iso 檔的開機選單
# 以下例子 iso 檔放在 sdc6 fat32 分割區中
# 磁碟代號或 uuid 請自行改成實際的值
# 利用以下指令查看 uuid
# ls -l /dev/disk/by-uuid/
#-------------------------------------------
menuentry "ubuntu-10.04-netbook-i386" {
# set root=(/dev/sdc,6)
# savedefault
search --no-floppy --fs-uuid --set EBC5-7B3D
set isofile="/iso/ubuntu-10.04-netbook-i386.iso"
loopback loop $isofile
linux (loop)/casper/vmlinuz file=/cdrom/preseed/ubuntu.seed boot=casper persistent iso-scan/filename=$isofile noprompt splash
initrd (loop)/casper/initrd.lz
}
menuentry "ubuntu-10.04-desktop-i386" {
set root=(/dev/sdc,6)
search --no-floppy --fs-uuid --set EBC5-7B3D
set isofile="/iso/ubuntu-10.04-desktop-i386.iso"
loopback loop $isofile
linux (loop)/casper/vmlinuz file=/cdrom/preseed/ubuntu.seed boot=casper persistent iso-scan/filename=$isofile noprompt splash
initrd (loop)/casper/initrd.lz
}
menuentry "ubuntu-10.04-desktop-amd64" {
set root=(/dev/sdc,6)
search --no-floppy --fs-uuid --set EBC5-7B3D
set isofile="/iso/ubuntu-10.04-desktop-amd64.iso"
loopback loop $isofile
linux (loop)/casper/vmlinuz file=/cdrom/preseed/ubuntu.seed boot=casper persistent iso-scan/filename=$isofile noprompt splash
initrd (loop)/casper/initrd.lz
}
#-------------------------------------------

3. sudo update-grub

eMule 0.50a 更新

更新 eMule 加大 Buffer 版到 0.50a
ed2k://|file|emule0.50a1.rar|
1898037|B175A03C9B285879869534EDF3AD2D62|h=SSZIM3KHUFVQFVQDFYE7NARGLUREKAV2|/

使 用 eMule 下載,
Tools -> Paste eD2K Links...
或到原來發布的網頁下載 (Google Page Creator 不見了,網頁被轉到協作平台了)
http://sites.google.com/site/kinmenalex/

這次 0.50a 的更新在第一次執行的時候,eMule 好像在轉換什麼東西,會執行得比較久,第二次以後就恢復正常了。

對齊 df title

在中文語系下有些console顯示的項目無法對齊,只好來作些多餘的動作,切回英文顯示,然後再切換回來。

~/bin/df.sh
--------------------------------------------
#/bin/sh
#alias df='~/bin/df.sh'
lang=$LANG
export LANG=en
df $1 $2 $3
export LANG=$lang
lang=
--------------------------------------------

.bashrc
--------------------------------------------
...
alias df='~/bin/df.sh'
alias dir='ls -l --color=auto'
...
--------------------------------------------