Ubuntu fcitx array30 行列輸入法簡易安裝

 sudo apt install fcitx-table-array30

# 預設的array30不符合 Windows 的使用習慣,使用替代方案


FCITX 行列30加強版 (添加一、二級簡碼和 w 特殊符號組)

https://www.rocksaying.tw/archives/fcitx-table-array30plus_v2.html

https://github.com/shirock/rocksources/tree/master/linux/fcitx-table-array30plus


# 解開後用 array30plus.mb 取代原來的 table 即可

mkdir -p ~/.config/fcitx/table

cp array30plus.mb ~/.config/fcitx/table/array30.mb


# 然後設定 

輸入法設定->全域設定->候選字數 10

# 熟悉的輸入法回來了

Ventoy 設定開機到硬碟的 Ubuntu(grub)

    將這兩個設定檔 ventoy.json, ventoy_grub.cfg,

放入 /ventoy 目錄,這時開機預設會執行 ventoy_grub.cfg 裡面的項目,


注意將 (hd1,msdos1) 改成你 grub 所在的磁碟分割,

在選單按 c 進入 grub 命令列尋找。

grub> ls 

(proc) (hd0) (hd0,msdos2) (hd0,msdos1)


#== /ventoy/ventoy.json ==#

{

    "control": [

        { "VTOY_MAX_SEARCH_LEVEL": "2" },

        { "VTOY_DEFAULT_SEARCH_ROOT": "/" },

        { "VTOY_MENU_TIMEOUT": "10" },

        { "VTOY_DEFAULT_IMAGE": "F6>Grub2 Menu" }

    ],

    "persistence": [

        {

            "image": "/ventoy/lubuntu-20.04.3-desktop-amd64.iso",

            "backend": [

                "/ventoy/persistence_ext4_512MB_casper-rw.dat",

                "/ventoy/persistence_ext4_1GB_casper-rw.dat"

            ],

            "autosel": 1,

            "timeout": 10

        }

    ]    

}

#== /ventoy/ventoy.json ==#

參考:https://www.ventoy.net/en/plugin_control.html

另外 persistence 讓 LiveCD 可以儲存設定

相關檔案在:https://www.ventoy.net/en/plugin_persistence.html


#== /ventoy/ventoy_grub.cfg ==#

set timeout=10

set default="0"

# Press c ,grub> ls, to find out the partition number

# Press e to edit menu

menuentry "Boot to (hd1,msdos1) grub" --class=custom {

configfile (hd1,msdos1)/boot/grub/grub.cfg

}


menuentry '<-- Return to previous menu [Esc]' --class=vtoyret VTOY_RET {

    echo 'Return ...'

}

#== /ventoy/ventoy_grub.cfg ==#


GA-A320M-S2H Ryzen 3200G Install Windows 7

 GA_A320M_S2H R3200G Install Win7 筆記


Gigabyte GA-A320M-S2H 

AMD Ryzen3 3200G with Radeon Vega 8 Graphics

SAMSUNG 860 EVO 500GB SATA SSD 

ADATA XPG SX8200Pro 512G M.2 NVMe SSD

PS/2 鍵盤 <-- 重要

還有需要另外一台可上網的電腦


輕鬆製作可開機的 USB 磁碟機 

https://rufus.ie/zh_TW.html


Gigabyte Windows USB Installation Tool 


Windows USB Installation Tool

(Note) Support AMD series motherboards.


https://www.gigabyte.com/tw/Motherboard/GA-A320M-S2H-rev-1x/support#support-dl-utility

https://www.fox-saying.com/blog/post/45612723


None - Add USB drivers

第一,二項 USB 跟 NVNe drivers 成功

第三項 Add Packages 失敗


拿這個隨身碟接在USB2.0 Port

安裝程式可以看到 SATA 看不到 NVMe,

最後安裝在 SATA SSD 上,第一次開機後就無限藍白畫面,

以上失敗。


之後成功的是先安裝在VM裡,sysprep,然後Clonezilla複製到實體機器。

https://clonezilla.nchc.org.tw/clonezilla-live/download/


使用的是 2017 年安裝好的 VM Win7 sp1 x64


sysprep

http://bluesky0215.blogspot.com/2017/05/windows-7-sysprep.html


進入系統稽核模式

一般化打勾:移除SID織別碼。

關機後不要再開進去,這時用Clonezilla開機製作 Disk image 到 samba server


在實體機器用 Clonezilla開機,還原 Disk image 到 SATA 硬碟。


安裝驅動程式重開後 sysprep 一直出現,又作了一次

進入系統全新體驗

不勾一般化


驅動程式

Drivers

https://www.gigabyte.com/tw/Motherboard/GA-A320M-S2H-rev-1x/support#support-dl-driver-chipset


一剛開機時USB是不會動的,所以要一個PS/2鍵盤執行安裝USB驅動程式,


從技嘉網站裝了這幾個之後,背板的USB2.0會動,USB3.0不會動,前面的USB3.0會動,網路ok,內顯沒完全正常。

AMD Chipset Driver 

mb_driver_amd_chipset_w7_17.40.RC30.zip

AMD Chipset Driver (include chipset \ USB driver) 

mb_driver_amd_chipset_18.10_0813.zip

AMD APU Graphics Driver 

mb_driver_am4_apu_18.9.1.zip

Realtek LAN Driver 

mb_driver_lan_realtek_am4_7.101.0714.2016.zip


後來裝了這個內顯有驅動

https://unikoshardware.com/2020/04/windows-7-ryzen-apu-graphics-driver.html

Radeon-iCafe-20.3.1-Win7-64Bit_Ryzen_APU_Only.7z


這時候裝置管理員還有幾個!驚嘆號


找 AMD 官網驅動,其實好像一開始裝這個就好,上面的不確定需不需要。

https://www.amd.com/zh-hant/support

radeon-software-adrenalin-2020-21.3.1-minimalsetup-210323_web.exe

radeon-software-adrenalin-2020-21.3.1-win10-64bit-mar24.exe


這時候剩一個 NVMe 還不會動,Google 感覺是要 Windows hotfix

使用 

Windows 7 SP1 Update Package 更新包

https://wmos.info/archives/18340


NVMe SSD 就正常了

ADATA XPG SX8200Pro 512G M.2 NVMe SSD


其他資源


Windows 7 SP1 多國語言包

https://codertw.com/%E7%A8%8B%E5%BC%8F%E8%AA%9E%E8%A8%80/606543/


最後成果


停用 Firefox 更新通知

 Disable Firefox Update

停止 Firefox 一直跳出更新通知,如果你不想更新目前的版本。

參考:

https://winaero.com/disable-updates-firefox-63-above/


新增登錄值

REGEDIT

#-----------------------------------------------------------------------------

Windows Registry Editor Version 5.00

[HKEY_LOCAL_MACHINE\Software\Policies\Mozilla\Firefox]

"DisableAppUpdate"=dword:00000001

#-----------------------------------------------------------------------------


AdGuardHome Windows Setup


  AdGuard Home 與 Pi-hole 一樣利用 DNS 過濾的方法來擋廣告,對於不能裝AdBlock的手機、平板或是智慧電視之類的裝置,成為一種全域的擋廣告解決方案。
https://adguard.com/en/adguard-home/overview.html

安裝
  AdGuard Home 幾乎可以裝在任何平台上,今天要講的是在Windows上的設定,
請從這裡下載: 
https://github.com/AdguardTeam/AdGuardHome#installation
Windows 64-bit
https://static.adguard.com/adguardhome/beta/AdGuardHome_Windows_amd64.zip
Windows 32-bit
https://static.adguard.com/adguardhome/beta/AdGuardHome_Windows_386.zip

解開後只有單一個執行檔
AdGuardHome.exe

執行
會跑出一個 Dos 視窗,最後會列出一些IP是用來做第一次設定的網址 :
 [info] Go to http://192.168.2.8:3000

用瀏覽器連上其中一個網址

  http://192.168.2.8:3000
 
這時候會看到這個畫面

歡迎至 AdGuard Home!

如果連不上,可能是防火牆的影響,請設定
控制台\所有控制台項目\Windows 防火牆\允許的程式


 Firewall allow program

  允許其他程式(R)... 把 AdGuardHome.exe 這個程式加進去。

 下一步

AdGuard Home Install step 2

 設定管理及DNS監聽介面的IP,或是直接按下一頁也可以

 設定管理帳密

AdGuard Home Install step 3

 下一步
AdGuard Home Install step 4

 這裡是說明如何設定每種裝置的DNS,請先按下一頁,稍後說明


 完成後進入
 儀表板


 AdGuardHome 儀表板

如果有看到這個 Error

 Error: control/version.json | Couldn't get version check json from https://static.adguard.com/adguardhome/beta/version.json: *url.Error Get https://static.adguard.com/adguardhome/beta/version.json: couldn't lookup host: static.adguard.com | 502

 似乎是 Windows 版的 AdGuardHome 對於 DNS-over-HTTPS 有問題
 在 Linux 版的沒遇到

AdGuardHome.exe -v debug message
 cause: couldn't do a POST request to 'https://1.1.1.1:443/dns-query',
cause: Get https://1.1.1.1:443/dns-query?dns=96oBAAABAAAAAAAACGlwdjRvbmx5BGFycGEAAAEAAQ: x509: certificate is valid for 1.1.1.1, 1.0.0.1, 162.159.132.53, 2606:4700:4700::1111, 2606:4700:4700::1001, 2606:4700:4700::64, 2606:4700:4700::6400, 162.159.36.1, 162.159.46.1, not 1.1.1.1 


這時候用上面選單的 DNS 設定
 
 DNS Setup menu
 
 把上游的 DNS 伺服器

 https://1.1.1.1/dns-query
 https://1.0.0.1/dns-query

 改成你常用的DNS就可以了

 168.95.1.1
 8.8.8.8

AdGuardHome DNS Setup
套用


 AdGuard Home stat

  上面安裝的步驟4或選單上的安裝指南中有提到如何設定每種裝置的DNS指到 AdGuard Home DNS其中最全面的方法就是更改 WiFi/IP 分享器裡的 DHCP/DNS 設定,把DNS改成 AdGuard Home IP,當手機使用用WiFi時,會自動使用裡面的DNS,而且分享器下的所有裝置都適用。


請連到你的WiFi/IP 分享器上設定DNS伺服器 (通常是  http://192.168.1.1/ 以下是我自己的,設定畫面會類似)
  AP DHCP DNS
 
 最後回到儀表板上可以看到各個IP的使用狀況。

 另外要重新設定時把設定檔刪除就可以了
 AdGuardHome.yaml

 設定參考
 https://github.com/AdguardTeam/AdGuardHome/wiki/Configuration

 安裝服務
 AdGuardHome.exe -s install

複製Win7開機硬碟到較小的SSD

Note 複製Win7開機硬碟到較小的SSD


2T to 480G

Clonezilla --> clone sda1 & sda2 (boot and system partition)

or

Macrium Reflect Free
How to Clone Windows from a Hard Disk to an M.2 SSD (and Keep It Bootable)
https://www.youtube.com/watch?v=BZqkYnmDnas


WIN7系統開機 Windows Boot Manager 出現「狀態: 0xc000000e」

Windows 7 安裝光碟或USB隨身碟修複


舊硬碟如果要和複製後的新硬碟在一起使用

磁碟簽章衝突而離線
Cloned disk - duplicate disk signature

list disk
select disk 0
uniqueid disk
uniqueid disk id=1234abcd

Windows 7 安裝光碟或USB隨身碟修複

用網芳管理手機檔案 Android samba server

用網路芳鄰管理手機檔案 Android samba server

    主要目的是為了備份手機或平板的檔案,因為我喜歡用 FastCopy  來作同步,它可以只複製新增或有修改過的檔案,並保留檔案及目錄的日期。原本是手機裝個 samba server 就可以解決的,但非root手機只能用非標準的port,Windows又只能連標準的 samba 139,445。
這邊用一個迂迴的方式來達成:
Windows <-samba-> Ubuntu <-sftp-> Android
使用萬能的 Linux 來作轉換,
首先是手機裝上 sftp server,我是使用這個

android sftp server
設定好帳號跟目錄後就可以啟動

可以先使用 FileZilla 來測試連線是否正確,就備份的角度來看,FileZilla 已經可以作到,只是我們想要的是讓Windows檔案總管可以使用。
下一步,安裝一個 Ubuntu Server,獨立機器或VM都可以,這邊假設只有一台PC,
使用VirtualBox安裝,想要省記憶體的可以裝 Server 版,預設是沒有桌面的。
http://releases.ubuntu.com/16.04.4/ubuntu-16.04.4-server-i386.iso
啟用兩張網卡,第一張安裝時用NAT安裝完成後用Bridged,第二張網卡用Host-only
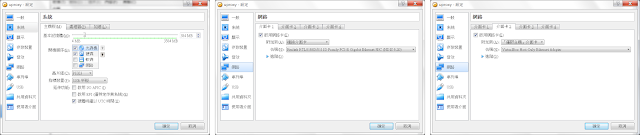
VirtualBox nic bridged host-only

Ubuntu 安裝軟體
sudo apt-get update
sudo apt-get install openssh-server samba sshfs

設定 samba server

sudo nano /etc/samba/smb.conf
#################################
[global]
hosts deny = ALL
hosts allow = 127. 192.168.0.0/16
unix extensions = no

[homes]
comment = Home Directories
browseable = no
read only = no
valid users = %S
follow symlinks = yes
wide links = yes
#################################
新增/設定 samba user password
sudo smbpasswd -a alex
重啟
sudo /etc/init.d/samba restart

設定網路
sudo nano /etc/network/interfaces
#################################
auto enp0s3
#iface enp0s3 inet dhcp
iface enp0s3 inet static
address 192.168.0.88
netmask 255.255.255.0

auto enp0s3:1
iface enp0s3:1 inet static
address 192.168.1.88
netmask 255.255.255.0

auto enp0s8
iface enp0s8 inet static
address 192.168.56.88
netmask 255.255.255.0
#################################
sudo /etc/init.d/networking restart

網卡如果是後來才新增的,可以先查看網卡名字
dmesg | grep eth
[    2.289998] e1000 0000:00:03.0 eth0: (PCI:33MHz:32-bit) 08:00:27:71:36:fc
[    2.290612] e1000 0000:00:03.0 eth0: Intel(R) PRO/1000 Network Connection
[    2.709290] e1000 0000:00:08.0 eth1: (PCI:33MHz:32-bit) 08:00:27:92:d3:27
[    2.709857] e1000 0000:00:08.0 eth1: Intel(R) PRO/1000 Network Connection
[    2.711572] e1000 0000:00:03.0 enp0s3: renamed from eth0
[    2.714426] e1000 0000:00:08.0 enp0s8: renamed from eth1

測試連線
ssh -p46234 alex@192.168.0.4
Unable to negotiate with 192.168.0.4 port 46234: no matching host key type found. Their offer: ssh-dss
如果出現上面這個訊息是因為手機ssh server的加密方法太舊,預設已不再使用,可以修改設定檔後使用
nano ~/.ssh/config
#################################
Host 192.168.0.*
  HostKeyAlgorithms=+ssh-dss
#################################

利用 sshfs 掛載手機目錄
mkdir myphone
sshfs -o allow_other -o idmap=user -o uid=1000 -o gid=1000 -o reconnect -o compression=no -p46234 alex@192.168.0.4:/ myphone/

如果連線正確,目錄下就是手機的檔案
ls myphone/
acct                   factory_init.rc       meta_init.rc
advanced_meta_init.rc  fstab                 mnt
cache                  init                  proc
...

如果要結束連線,可以用這個指令
fusermount -u myphone/


回到 Windows Explorer,在路徑打上
\\192.168.56.8\alex\myphone
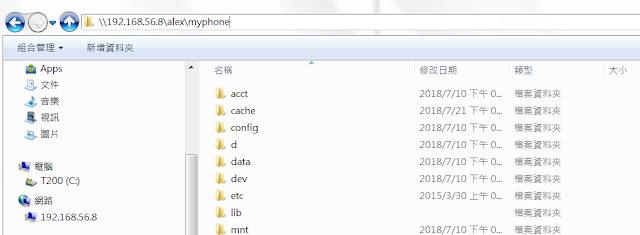
Windows samba to android
完成。
可存取的目錄可能隨著手機不一樣,這台是放在  sdcard/ 之下,
這樣管理檔案方便多了。


補充1:
上面那個 sftp 軟體似乎太舊沒有權限存取新手機裡的實體SD卡目錄,所以又試用了另一個,
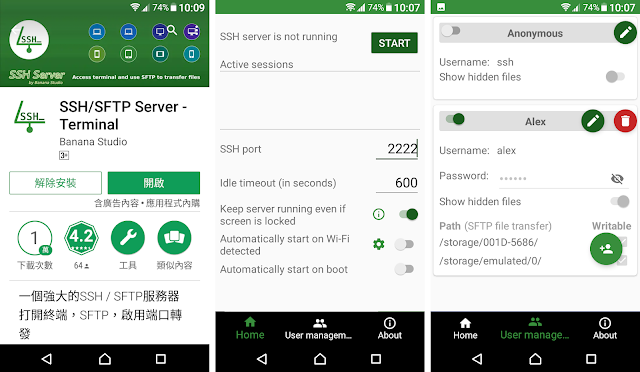
SSH Server SD Card
User 設定那邊加了兩個目錄,一個是 SD 卡的目錄 001D-5686/,一個是手機內部儲存的目錄 0/,SD 卡目錄的名稱是磁碟的序號,是格式化的時候產生的,理論上每張卡都不一樣。
掛載的方式為,先產生兩個目錄,

mkdir myphone/sdcard/
mkdir myphone/sandisk32/

然後再分別掛載上去。
sshfs -o allow_other -o idmap=user -o uid=1000 -o gid=1000 -o reconnect -o compression=no -p2222 alex@192.168.0.8:/0/ myphone/sdcard/
sshfs -o allow_other -o idmap=user -o uid=1000 -o gid=1000 -o reconnect -o compression=no -p2222 alex@192.168.0.8:/001D-5686/ myphone/sandisk32/


Arduino oscilloscope 22kHz bandwidth

  簡易 Arduino 示波器

    Arduino 的 ADC 是很好用的東西,可以用來測量電壓轉成數位資料,而示波器就是把隨著時間變化的電壓畫成圖形表示出來,利用 arduino 的 ADC 加上電腦的繪圖能力,作成了一個簡易示波器。

Arduino oscilloscope - flashlight waveform
做了一下功課,已經有人作了Arduino 示波器 (不靠其的的元件,只用 arduino)
窮人的示波器 - 使用 arduino 透過序列埠傳到到電腦,然後用 Processing 程式作繪圖。
Arduino – Poor Man’s Oscilloscope
http://randomnerdtutorials.com/arduino-poor-mans-oscilloscope/

arduino 接上電腦後用 Processing IDE 執行他的程式,可以看到由右往左一直捲動的波形,我有一台示波器了 :)。用10k電阻加光敏電阻做了一個測試電路來觀察波形,用手電筒的光照射產生電壓變化,得到了以上的波形,手電筒有五檔變化:強光、中光、弱光、爆閃、SOS,可以看到中光和弱光是用PWM來調整亮度的。

Arduino oscilloscope photo resistor test circuit

可惜的是原來的程式算了一下每秒大約更新 400 個點,對一個示波器來說最重要的參數就是頻寬,除了看到變化,更希望能看到細節。看了一下程式作了一些改進,首先是 Serial 的速度從 9600 提高到了115200 bps,然後每個點原來是送3個byte,改成只送1個byte,犧牲了解析度換取速度,這樣從每秒 400 個點提高到了每秒約 8300 個點,原以為這樣就是極限了,但還有更好的方式,待續 ...


LM317 8.4V Li-ion Battery Charger

自製 9V 鋰電充電器  
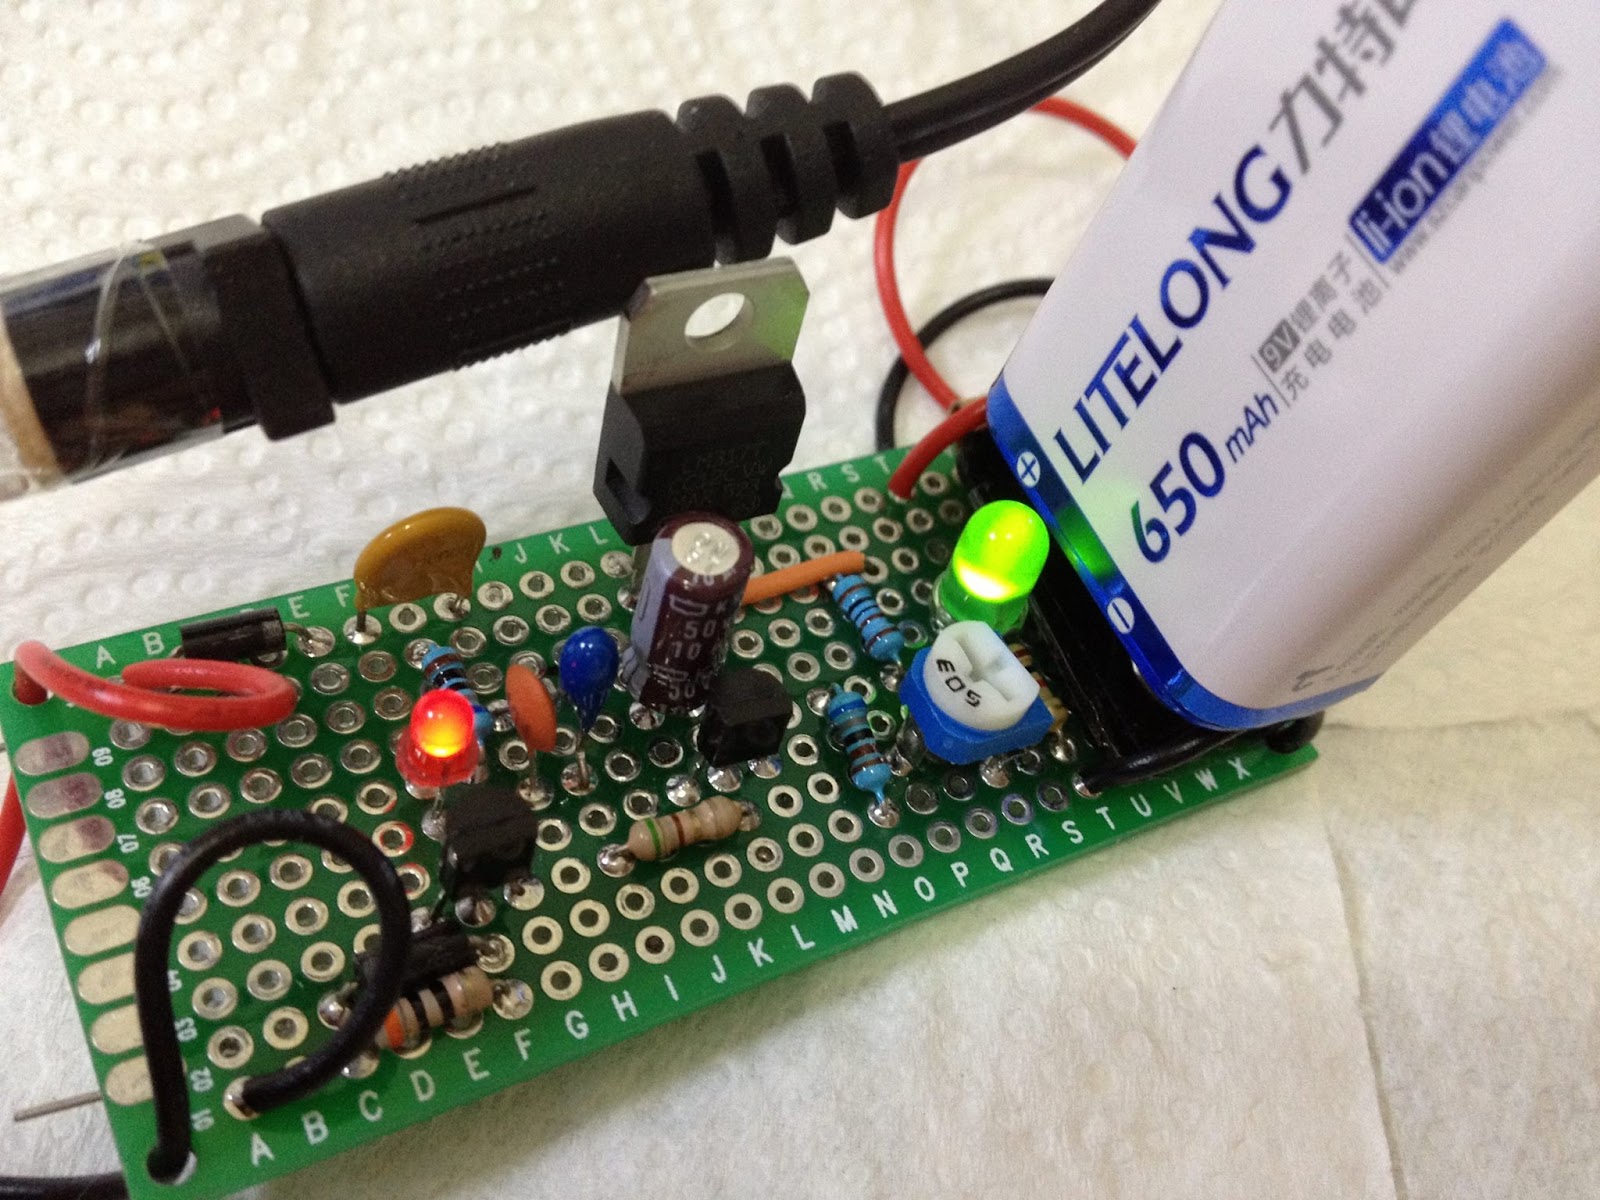
因新電表太耗電所以買了9V 充電電池,但某南孚環高充電器質量實在太差,沒法停止充電,只好想到自己作一個充電器
LM317 8.4V Li-ion charger 1.jpg
LITELONG 力特朗 9V 650mAh li-ion 鋰離子 充電電池 充電中 

LM317 8.4V Li-ion charger 2.jpg
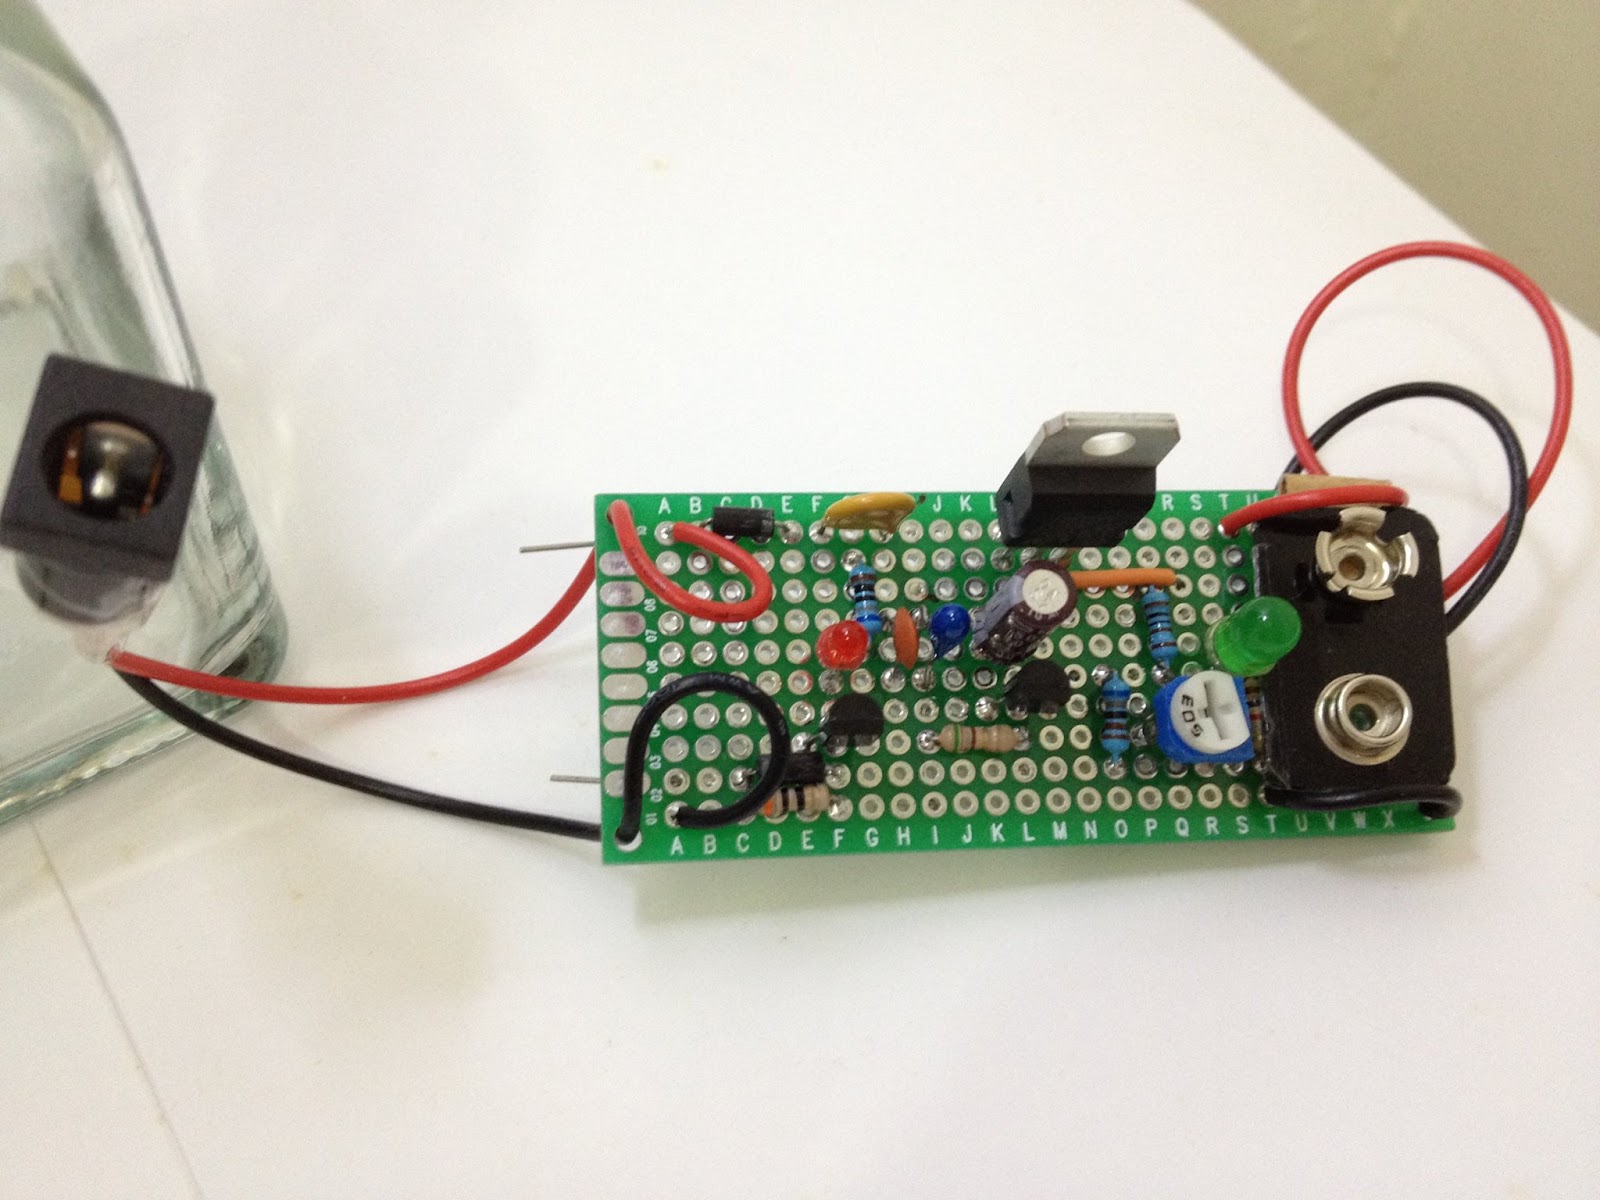
9V battery plug 是從舊電池拆下來的

LM317 8.4V Li-ion charger 3.jpg
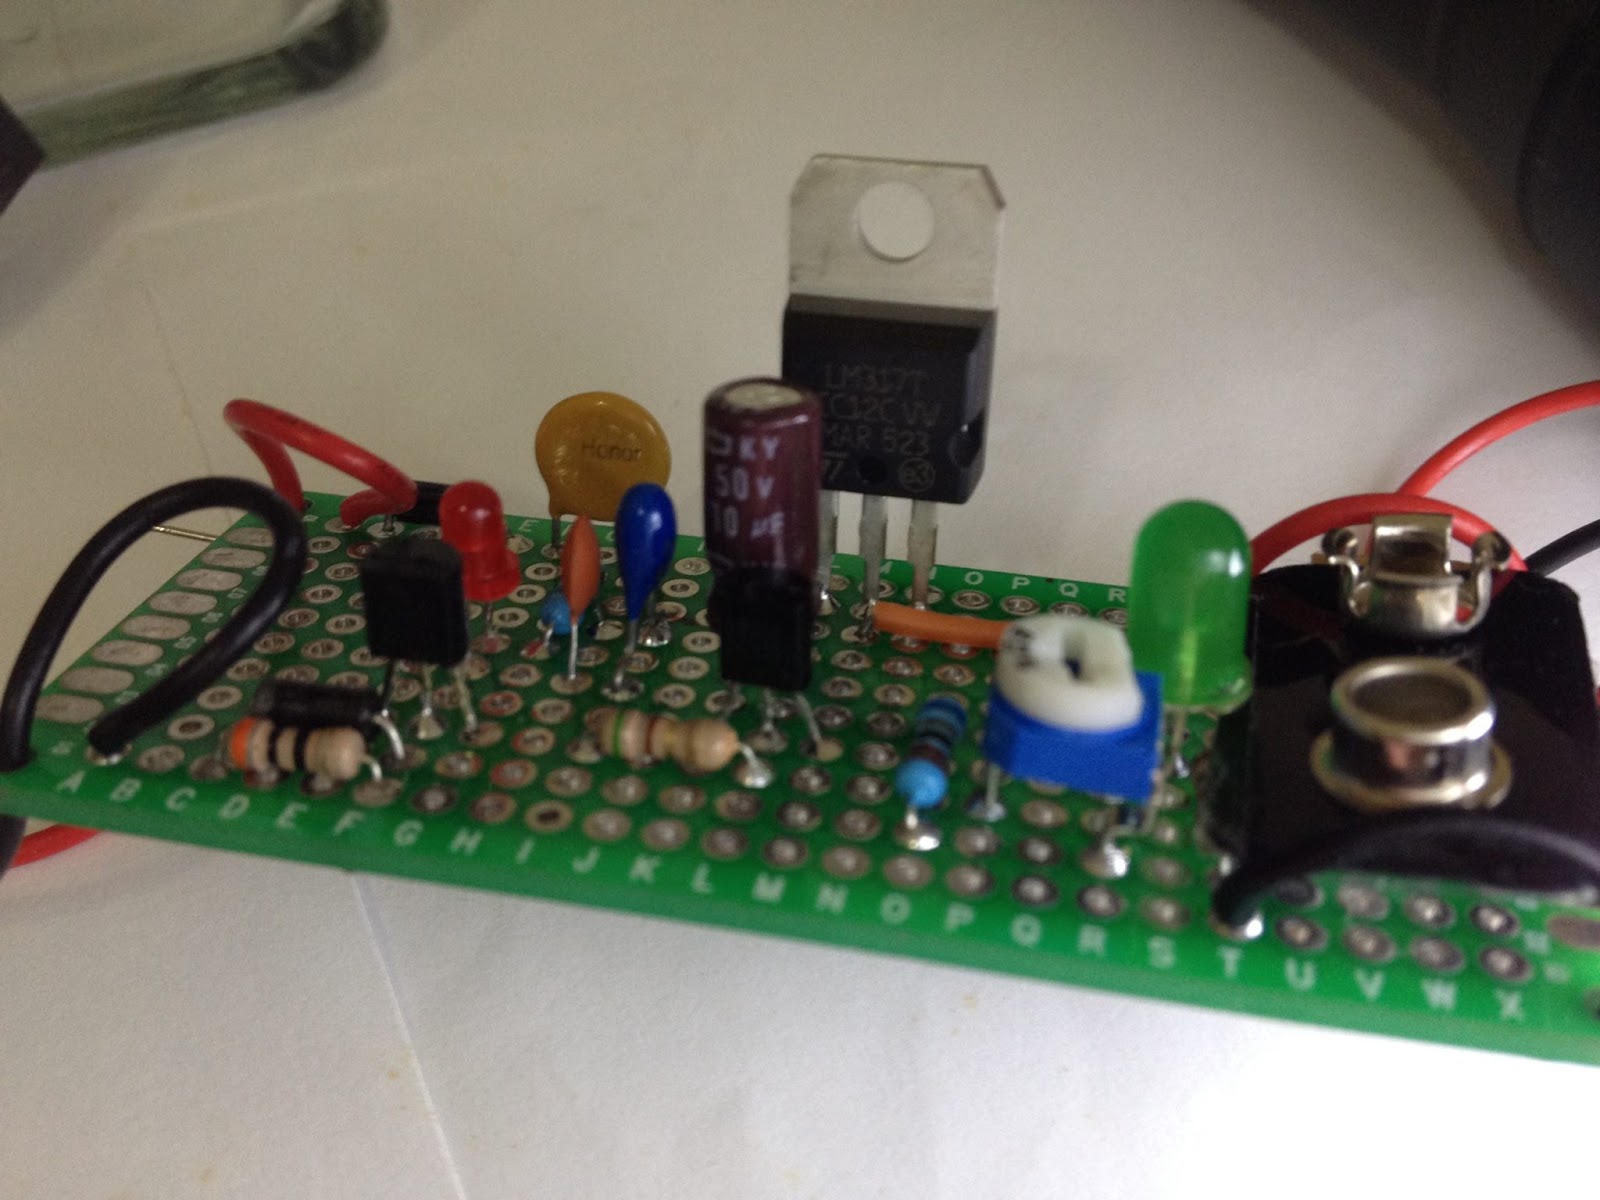
主要零件 LM317 voltage regulator

LM317 8.4V Li-ion charger_board.jpg
LM317 8.4V  li-ion battery charger circuit

LM317 8.4V  li-ion battery charger schematic


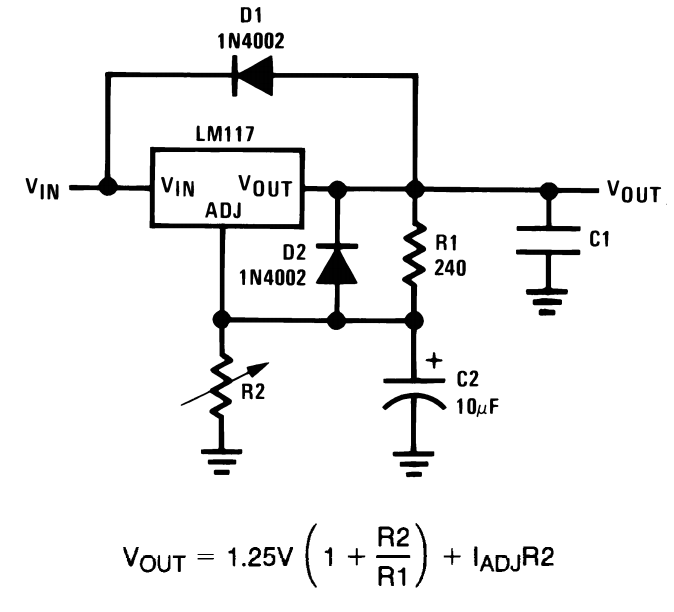
關鍵零件用的是 LM317 可調式線性穩壓器
LM317.png

http://goods.ruten.com.tw/item/show?21403122108813

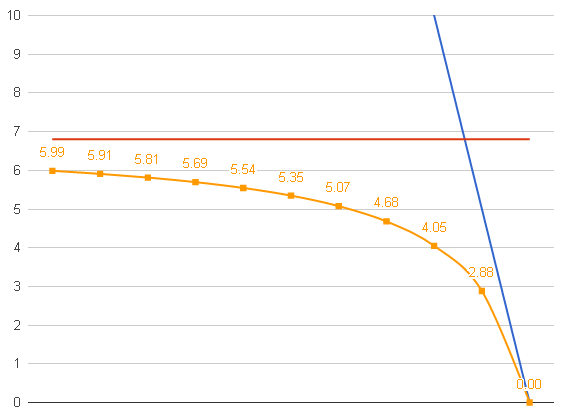
LM317 用兩個電阻來調整輸出電壓(Vout=1.25V(1+R2/R1)+IadjR2),跟據datasheet 的範例 R1 的範圍從 240Ω~1.2kΩ,假設選定 R1=1k, Vout = 8.4V, 則R2 = R1(Vout - 1.25) / (1.25 + Iadj R1) = 5.296kΩ,因為手邊只有 50k 可變電阻,所以拿它與 6.8k 並聯成 為 R2,電阻範圍從 0Ω~ 5.99kΩ,

VR 5.99.png
6.8k與50k可變電阻並聯

得到可調電壓 Vout 從 1.25V 到 8.733V,完成後可以用電表測量,調整輸出電壓在 8.3V~8.4V左右。


鋰電池充電需要的是定電流及定電壓,
constant current constant voltage.jpg

Current Limited 6V Charger.png


參考datasheet範例,利用一個NPN電晶體及電流感測電阻,設定電流為0.6/R,當電流增大,使得電阻上的電壓大於0.6時,使得電晶體導通,ADJ 電位下降導致 Vout 下降,然後電流就可以維持在設定的範圍內。照片上目前只放了一個5Ω電阻,所以輸出是 120mA功率為 0.6V * 0.12A = 0.072W,所以 1/4 瓦的電阻還夠用


電源指示燈
LM317 有最小負載電流的需求用來維持晶片的運作,約 3.5~10mA,一般是利用設定電壓電阻來順便達成(例:R1 選用 240 Ω),這裡因為選用的電阻較大R1=1k, R2=5.29k,  8.4V / 6.29k = 1.33 mA,所以在輸出上加一個LED燈,剛好維持住最小負載電流。
http://electronics.stackexchange.com/questions/18524/resistors-values-to-use-with-lm317


充電電流指示燈
利用二極體及電阻的分流達成了在充電一開始時較亮,然後隨著充電電流變小時慢慢變暗,在電流小於10mA左右熄滅,就可以得知充電完成

散熱
如果長時間輸出 120mA 以上的話,LM317 最好要有散熱片

超便宜測量電感的方法 Inexpensive measuring inductance with arduino

   一般要量測電感需要專用的 LCR 電錶或是用示波器,都不便宜,在網路上找到這篇
https://reibot.org/2011/07/19/measuring-inductance/ ,
使用 arduino 加上一個極簡單的電路達成,
關鍵的元件只有三個:
一個電壓比較器或 op amp、
兩個 1uF 無極性電容、
以及一台 arduino 相容板。

我用的是 LM393P 低功耗電壓比較器 $2
http://goods.ruten.com.tw/item/show?21403134960362

陶瓷電容 1uF(105) $0.8
http://goods.ruten.com.tw/item/show?21439300127596
或是用較小的並䏈
陶瓷電容 0.1uF(104) $8
http://goods.ruten.com.tw/item/show?21601579393657


電路圖

Measuring inductance with arduino
程式
// resonant frequency counting for inductance measuring
#define chargePin 13
#define pulsePin 11
void setup() {
  Serial.begin(115200);
  pinMode(pulsePin, INPUT);
  pinMode(chargePin, OUTPUT);
  Serial.println("LC Meter");
}
double pulse, frequency, inductance;
void loop() {
digitalWrite(chargePin, HIGH); // charge LC circuit.
delay(5);
digitalWrite(chargePin, LOW);
//
pulse = pulseIn(pulsePin, HIGH, 1000); //returns 0 if timeout
if (pulse > 0.1) {
 const double capacitance = 1.89E-6; // ~2 uF
 frequency = 1E6 / (2 * pulse);
 inductance = 1E6 / ( 4 * 3.1415926535 * 3.1415926535 * capacitance * frequency * frequency );
 Serial.print( int(pulse) );
 Serial.print(" uS, ");
 Serial.print( frequency );
 Serial.print(" Hz, ");
 Serial.print( inductance );
 Serial.println(" uH");
}
delay(480);
}
// end

原理:
當LC電路放電時,會震盪產生一個頻率,叫 resonant frequency
f = 1/(2π√LC)
https://en.wikipedia.org/wiki/LC_circuit

已知電容和頻率就可以算出電感
L =  1 / (4C π^2 f^2)

arduino 測量頻率的方法:
LC 的信號經過比較器後變成 0~5V 的方波(大於零變5V 小於零變 0V)
arduino 的 pluseIn() 可以測量信號在 HIGH 的時間

所以 頻率 f = 1 / ( 2 * pluseIn() 時間)

我的兩個1uF電容量測起來約 ~1.89 uF,使用較小的電容時因為頻率會上升,
arduino 的限制無法量到更小的時間 (10^-6),如果要量較小的電感,需要較大的電容,
用 1.89uF 實測可以量到 10 uH 以上。


Li-ion emergency light circuit with low voltage cutoff protection

Emergency light circuit with low voltage protection.


Emergency light and low voltage cutoff circuit 

Using forward voltage drop of LED to protect lithium ion battery from getting too low.
The light will be cutoff around 3 volts.
The upper limit voltage of eight chip LED is higher than battery, no need to add current limit resistor.


Emergency Light NPN PNP 1W LED Low Voltage Protection

Emergency light npn pnp perfboard


Emergency light npn pnp usb power two led


Emergency light npn pnp 18650 li-ion two led ON


Emergency light circuit


Emergency light circuit using NPN transistors & 1W LED

Emergency light circuit  NPN
1W 300~350mA LED  (or multiple LEDs in parallel)
Cell phone Li-ion battery 3.7V
USB 5V power
S8050 NPN  20V 700mA transistor control LED current
Adjustable brightness
Charge current indicator LED
Minimum standby current


Emergency light circuit
Simplified version

Choice of R1 for LED
20mA  40k
40mA  20k
60mA  13.3k
80mA  10k
100mA 8k
200mA 4k
300mA 2.6k


Emergency light circuit PNP


Raspberry Pi 3 on SSD


  在 Raspberry Pi3 測一下 MicroSD 的速度 ,感覺比 Pi2 還差,
同樣的 SD 卡 在 Pi2 可以達到 18 MB/s,
在 Pi3 上只有 14.6 MB/s 。
Kingston 32G Pi 3 Benchmark


SD 卡太慢來試一下 USB 開機:

參考文章
http://www.instructables.com/id/Boot-the-Raspberry-Pi-from-USB/

SD 卡還是須要用來引導開機,用文字編輯 /boot 下的  cmdline.txt 更改 root 指向的磁碟

cmdline.txt
dwc_otg.lpm_enable=0 console=tty1 root=/dev/sda2 rootfstype=ext4 elevator=deadline rootwait quiet splash

我是用  Clonezilla  + 讀卡機 來複製 Pi 的分割區 
直接用最高級的組合 USB to SATA 快捷線 + SSD (Micron Crucial MX100 256G)

Pi3 boot from USB to SATA SSD Benchmark


Read 36.6 MB/s
Write 36.6 MB/s

看來 Pi3 USB 的極限在 36M :-)


Raspberry Pi 3 vnc

在 Raspberry Pi 3 安裝 vnc

作業系統安裝
Ubuntu MATE for Raspberry Pi 3


遠端桌面在Linux系統上有很多選擇,選 x11vnc 的原因是它與螢幕輸出的畫面是同步的。

安裝 x11vnc
sudo apt-get install x11vnc

設定密碼檔
sudo x11vnc -storepasswd /etc/x11vnc.pass

編輯檔案
sudo nano /lib/systemd/system/x11vnc.service
填入以下內容
#-----------------------------------------------
[Unit]
Description=Start x11vnc at startup.
After=multi-user.target

[Service]
Type=simple
ExecStart=/usr/bin/x11vnc -display :0 -allow 192.168.0.,192.168.1.2 -auth guess -forever -loop -repeat -rfbauth /etc/x11vnc.pass -rfbport 5900 -shared -noipv6 -no6

[Install]
WantedBy=multi-user.target  
#-----------------------------------------------
-allow 後面是允許連入的 IP, 請依需求更改。

最後啟動 service
sudo chmod u+x /lib/systemd/system/x11vnc.service
sudo systemctl daemon-reload
sudo systemctl enable x11vnc.service


重開,測試。


想測試命令參數時可以用下列單行指令
sudo /usr/bin/x11vnc -display :0 -allow 192.168.1.2 -auth guess -forever -loop -repeat -rfbauth /etc/x11vnc.pass -rfbport 5900 -shared -noipv6 -no6

參考:
http://manpages.ubuntu.com/manpages/wily/man1/x11vnc.1.html

ZyXEL NAS326 Transmission torrent download

  NAS326 可以透過安裝套件,自動下載torrent檔案,


從主畫面選管理員


套件-->安裝/升級-->啟用 Transmission


上傳torrent檔案,或是直接給torrent URL

下載還蠻快的 (檔案是為 Raspberry Pi 3 準備的 Ubuntu Mate 15.10.3)