Ubuntu fcitx array30 行列輸入法簡易安裝

 sudo apt install fcitx-table-array30

# 預設的array30不符合 Windows 的使用習慣,使用替代方案


FCITX 行列30加強版 (添加一、二級簡碼和 w 特殊符號組)

https://www.rocksaying.tw/archives/fcitx-table-array30plus_v2.html

https://github.com/shirock/rocksources/tree/master/linux/fcitx-table-array30plus


# 解開後用 array30plus.mb 取代原來的 table 即可

mkdir -p ~/.config/fcitx/table

cp array30plus.mb ~/.config/fcitx/table/array30.mb


# 然後設定 

輸入法設定->全域設定->候選字數 10

# 熟悉的輸入法回來了

Ventoy 設定開機到硬碟的 Ubuntu(grub)

    將這兩個設定檔 ventoy.json, ventoy_grub.cfg,

放入 /ventoy 目錄,這時開機預設會執行 ventoy_grub.cfg 裡面的項目,


注意將 (hd1,msdos1) 改成你 grub 所在的磁碟分割,

在選單按 c 進入 grub 命令列尋找。

grub> ls 

(proc) (hd0) (hd0,msdos2) (hd0,msdos1)


#== /ventoy/ventoy.json ==#

{

    "control": [

        { "VTOY_MAX_SEARCH_LEVEL": "2" },

        { "VTOY_DEFAULT_SEARCH_ROOT": "/" },

        { "VTOY_MENU_TIMEOUT": "10" },

        { "VTOY_DEFAULT_IMAGE": "F6>Grub2 Menu" }

    ],

    "persistence": [

        {

            "image": "/ventoy/lubuntu-20.04.3-desktop-amd64.iso",

            "backend": [

                "/ventoy/persistence_ext4_512MB_casper-rw.dat",

                "/ventoy/persistence_ext4_1GB_casper-rw.dat"

            ],

            "autosel": 1,

            "timeout": 10

        }

    ]    

}

#== /ventoy/ventoy.json ==#

參考:https://www.ventoy.net/en/plugin_control.html

另外 persistence 讓 LiveCD 可以儲存設定

相關檔案在:https://www.ventoy.net/en/plugin_persistence.html


#== /ventoy/ventoy_grub.cfg ==#

set timeout=10

set default="0"

# Press c ,grub> ls, to find out the partition number

# Press e to edit menu

menuentry "Boot to (hd1,msdos1) grub" --class=custom {

configfile (hd1,msdos1)/boot/grub/grub.cfg

}


menuentry '<-- Return to previous menu [Esc]' --class=vtoyret VTOY_RET {

    echo 'Return ...'

}

#== /ventoy/ventoy_grub.cfg ==#


GA-A320M-S2H Ryzen 3200G Install Windows 7

 GA_A320M_S2H R3200G Install Win7 筆記


Gigabyte GA-A320M-S2H 

AMD Ryzen3 3200G with Radeon Vega 8 Graphics

SAMSUNG 860 EVO 500GB SATA SSD 

ADATA XPG SX8200Pro 512G M.2 NVMe SSD

PS/2 鍵盤 <-- 重要

還有需要另外一台可上網的電腦


輕鬆製作可開機的 USB 磁碟機 

https://rufus.ie/zh_TW.html


Gigabyte Windows USB Installation Tool 


Windows USB Installation Tool

(Note) Support AMD series motherboards.


https://www.gigabyte.com/tw/Motherboard/GA-A320M-S2H-rev-1x/support#support-dl-utility

https://www.fox-saying.com/blog/post/45612723


None - Add USB drivers

第一,二項 USB 跟 NVNe drivers 成功

第三項 Add Packages 失敗


拿這個隨身碟接在USB2.0 Port

安裝程式可以看到 SATA 看不到 NVMe,

最後安裝在 SATA SSD 上,第一次開機後就無限藍白畫面,

以上失敗。


之後成功的是先安裝在VM裡,sysprep,然後Clonezilla複製到實體機器。

https://clonezilla.nchc.org.tw/clonezilla-live/download/


使用的是 2017 年安裝好的 VM Win7 sp1 x64


sysprep

http://bluesky0215.blogspot.com/2017/05/windows-7-sysprep.html


進入系統稽核模式

一般化打勾:移除SID織別碼。

關機後不要再開進去,這時用Clonezilla開機製作 Disk image 到 samba server


在實體機器用 Clonezilla開機,還原 Disk image 到 SATA 硬碟。


安裝驅動程式重開後 sysprep 一直出現,又作了一次

進入系統全新體驗

不勾一般化


驅動程式

Drivers

https://www.gigabyte.com/tw/Motherboard/GA-A320M-S2H-rev-1x/support#support-dl-driver-chipset


一剛開機時USB是不會動的,所以要一個PS/2鍵盤執行安裝USB驅動程式,


從技嘉網站裝了這幾個之後,背板的USB2.0會動,USB3.0不會動,前面的USB3.0會動,網路ok,內顯沒完全正常。

AMD Chipset Driver 

mb_driver_amd_chipset_w7_17.40.RC30.zip

AMD Chipset Driver (include chipset \ USB driver) 

mb_driver_amd_chipset_18.10_0813.zip

AMD APU Graphics Driver 

mb_driver_am4_apu_18.9.1.zip

Realtek LAN Driver 

mb_driver_lan_realtek_am4_7.101.0714.2016.zip


後來裝了這個內顯有驅動

https://unikoshardware.com/2020/04/windows-7-ryzen-apu-graphics-driver.html

Radeon-iCafe-20.3.1-Win7-64Bit_Ryzen_APU_Only.7z


這時候裝置管理員還有幾個!驚嘆號


找 AMD 官網驅動,其實好像一開始裝這個就好,上面的不確定需不需要。

https://www.amd.com/zh-hant/support

radeon-software-adrenalin-2020-21.3.1-minimalsetup-210323_web.exe

radeon-software-adrenalin-2020-21.3.1-win10-64bit-mar24.exe


這時候剩一個 NVMe 還不會動,Google 感覺是要 Windows hotfix

使用 

Windows 7 SP1 Update Package 更新包

https://wmos.info/archives/18340


NVMe SSD 就正常了

ADATA XPG SX8200Pro 512G M.2 NVMe SSD


其他資源


Windows 7 SP1 多國語言包

https://codertw.com/%E7%A8%8B%E5%BC%8F%E8%AA%9E%E8%A8%80/606543/


最後成果


停用 Firefox 更新通知

 Disable Firefox Update

停止 Firefox 一直跳出更新通知,如果你不想更新目前的版本。

參考:

https://winaero.com/disable-updates-firefox-63-above/


新增登錄值

REGEDIT

#-----------------------------------------------------------------------------

Windows Registry Editor Version 5.00

[HKEY_LOCAL_MACHINE\Software\Policies\Mozilla\Firefox]

"DisableAppUpdate"=dword:00000001

#-----------------------------------------------------------------------------


AdGuardHome Windows Setup


  AdGuard Home 與 Pi-hole 一樣利用 DNS 過濾的方法來擋廣告,對於不能裝AdBlock的手機、平板或是智慧電視之類的裝置,成為一種全域的擋廣告解決方案。
https://adguard.com/en/adguard-home/overview.html

安裝
  AdGuard Home 幾乎可以裝在任何平台上,今天要講的是在Windows上的設定,
請從這裡下載: 
https://github.com/AdguardTeam/AdGuardHome#installation
Windows 64-bit
https://static.adguard.com/adguardhome/beta/AdGuardHome_Windows_amd64.zip
Windows 32-bit
https://static.adguard.com/adguardhome/beta/AdGuardHome_Windows_386.zip

解開後只有單一個執行檔
AdGuardHome.exe

執行
會跑出一個 Dos 視窗,最後會列出一些IP是用來做第一次設定的網址 :
 [info] Go to http://192.168.2.8:3000

用瀏覽器連上其中一個網址

  http://192.168.2.8:3000
 
這時候會看到這個畫面

歡迎至 AdGuard Home!

如果連不上,可能是防火牆的影響,請設定
控制台\所有控制台項目\Windows 防火牆\允許的程式


 Firewall allow program

  允許其他程式(R)... 把 AdGuardHome.exe 這個程式加進去。

 下一步

AdGuard Home Install step 2

 設定管理及DNS監聽介面的IP,或是直接按下一頁也可以

 設定管理帳密

AdGuard Home Install step 3

 下一步
AdGuard Home Install step 4

 這裡是說明如何設定每種裝置的DNS,請先按下一頁,稍後說明


 完成後進入
 儀表板


 AdGuardHome 儀表板

如果有看到這個 Error

 Error: control/version.json | Couldn't get version check json from https://static.adguard.com/adguardhome/beta/version.json: *url.Error Get https://static.adguard.com/adguardhome/beta/version.json: couldn't lookup host: static.adguard.com | 502

 似乎是 Windows 版的 AdGuardHome 對於 DNS-over-HTTPS 有問題
 在 Linux 版的沒遇到

AdGuardHome.exe -v debug message
 cause: couldn't do a POST request to 'https://1.1.1.1:443/dns-query',
cause: Get https://1.1.1.1:443/dns-query?dns=96oBAAABAAAAAAAACGlwdjRvbmx5BGFycGEAAAEAAQ: x509: certificate is valid for 1.1.1.1, 1.0.0.1, 162.159.132.53, 2606:4700:4700::1111, 2606:4700:4700::1001, 2606:4700:4700::64, 2606:4700:4700::6400, 162.159.36.1, 162.159.46.1, not 1.1.1.1 


這時候用上面選單的 DNS 設定
 
 DNS Setup menu
 
 把上游的 DNS 伺服器

 https://1.1.1.1/dns-query
 https://1.0.0.1/dns-query

 改成你常用的DNS就可以了

 168.95.1.1
 8.8.8.8

AdGuardHome DNS Setup
套用


 AdGuard Home stat

  上面安裝的步驟4或選單上的安裝指南中有提到如何設定每種裝置的DNS指到 AdGuard Home DNS其中最全面的方法就是更改 WiFi/IP 分享器裡的 DHCP/DNS 設定,把DNS改成 AdGuard Home IP,當手機使用用WiFi時,會自動使用裡面的DNS,而且分享器下的所有裝置都適用。


請連到你的WiFi/IP 分享器上設定DNS伺服器 (通常是  http://192.168.1.1/ 以下是我自己的,設定畫面會類似)
  AP DHCP DNS
 
 最後回到儀表板上可以看到各個IP的使用狀況。

 另外要重新設定時把設定檔刪除就可以了
 AdGuardHome.yaml

 設定參考
 https://github.com/AdguardTeam/AdGuardHome/wiki/Configuration

 安裝服務
 AdGuardHome.exe -s install

複製Win7開機硬碟到較小的SSD

Note 複製Win7開機硬碟到較小的SSD


2T to 480G

Clonezilla --> clone sda1 & sda2 (boot and system partition)

or

Macrium Reflect Free
How to Clone Windows from a Hard Disk to an M.2 SSD (and Keep It Bootable)
https://www.youtube.com/watch?v=BZqkYnmDnas


WIN7系統開機 Windows Boot Manager 出現「狀態: 0xc000000e」

Windows 7 安裝光碟或USB隨身碟修複


舊硬碟如果要和複製後的新硬碟在一起使用

磁碟簽章衝突而離線
Cloned disk - duplicate disk signature

list disk
select disk 0
uniqueid disk
uniqueid disk id=1234abcd

Windows 7 安裝光碟或USB隨身碟修複

用網芳管理手機檔案 Android samba server

用網路芳鄰管理手機檔案 Android samba server

    主要目的是為了備份手機或平板的檔案,因為我喜歡用 FastCopy  來作同步,它可以只複製新增或有修改過的檔案,並保留檔案及目錄的日期。原本是手機裝個 samba server 就可以解決的,但非root手機只能用非標準的port,Windows又只能連標準的 samba 139,445。
這邊用一個迂迴的方式來達成:
Windows <-samba-> Ubuntu <-sftp-> Android
使用萬能的 Linux 來作轉換,
首先是手機裝上 sftp server,我是使用這個

android sftp server
設定好帳號跟目錄後就可以啟動

可以先使用 FileZilla 來測試連線是否正確,就備份的角度來看,FileZilla 已經可以作到,只是我們想要的是讓Windows檔案總管可以使用。
下一步,安裝一個 Ubuntu Server,獨立機器或VM都可以,這邊假設只有一台PC,
使用VirtualBox安裝,想要省記憶體的可以裝 Server 版,預設是沒有桌面的。
http://releases.ubuntu.com/16.04.4/ubuntu-16.04.4-server-i386.iso
啟用兩張網卡,第一張安裝時用NAT安裝完成後用Bridged,第二張網卡用Host-only

VirtualBox nic bridged host-only

Ubuntu 安裝軟體
sudo apt-get update
sudo apt-get install openssh-server samba sshfs

設定 samba server

sudo nano /etc/samba/smb.conf
#################################
[global]
hosts deny = ALL
hosts allow = 127. 192.168.0.0/16
unix extensions = no

[homes]
comment = Home Directories
browseable = no
read only = no
valid users = %S
follow symlinks = yes
wide links = yes
#################################
新增/設定 samba user password
sudo smbpasswd -a alex
重啟
sudo /etc/init.d/samba restart

設定網路
sudo nano /etc/network/interfaces
#################################
auto enp0s3
#iface enp0s3 inet dhcp
iface enp0s3 inet static
address 192.168.0.88
netmask 255.255.255.0

auto enp0s3:1
iface enp0s3:1 inet static
address 192.168.1.88
netmask 255.255.255.0

auto enp0s8
iface enp0s8 inet static
address 192.168.56.88
netmask 255.255.255.0
#################################
sudo /etc/init.d/networking restart

網卡如果是後來才新增的,可以先查看網卡名字
dmesg | grep eth
[    2.289998] e1000 0000:00:03.0 eth0: (PCI:33MHz:32-bit) 08:00:27:71:36:fc
[    2.290612] e1000 0000:00:03.0 eth0: Intel(R) PRO/1000 Network Connection
[    2.709290] e1000 0000:00:08.0 eth1: (PCI:33MHz:32-bit) 08:00:27:92:d3:27
[    2.709857] e1000 0000:00:08.0 eth1: Intel(R) PRO/1000 Network Connection
[    2.711572] e1000 0000:00:03.0 enp0s3: renamed from eth0
[    2.714426] e1000 0000:00:08.0 enp0s8: renamed from eth1

測試連線
ssh -p46234 alex@192.168.0.4
Unable to negotiate with 192.168.0.4 port 46234: no matching host key type found. Their offer: ssh-dss
如果出現上面這個訊息是因為手機ssh server的加密方法太舊,預設已不再使用,可以修改設定檔後使用
nano ~/.ssh/config
#################################
Host 192.168.0.*
  HostKeyAlgorithms=+ssh-dss
#################################

利用 sshfs 掛載手機目錄
mkdir myphone
sshfs -o allow_other -o idmap=user -o uid=1000 -o gid=1000 -o reconnect -o compression=no -p46234 alex@192.168.0.4:/ myphone/

如果連線正確,目錄下就是手機的檔案
ls myphone/
acct                   factory_init.rc       meta_init.rc
advanced_meta_init.rc  fstab                 mnt
cache                  init                  proc
...

如果要結束連線,可以用這個指令
fusermount -u myphone/


回到 Windows Explorer,在路徑打上
\\192.168.56.8\alex\myphone
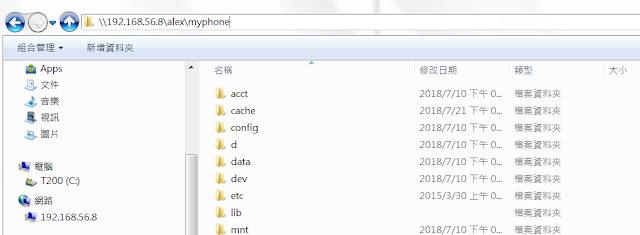
Windows samba to android
完成。
可存取的目錄可能隨著手機不一樣,這台是放在  sdcard/ 之下,
這樣管理檔案方便多了。


補充1:
上面那個 sftp 軟體似乎太舊沒有權限存取新手機裡的實體SD卡目錄,所以又試用了另一個,
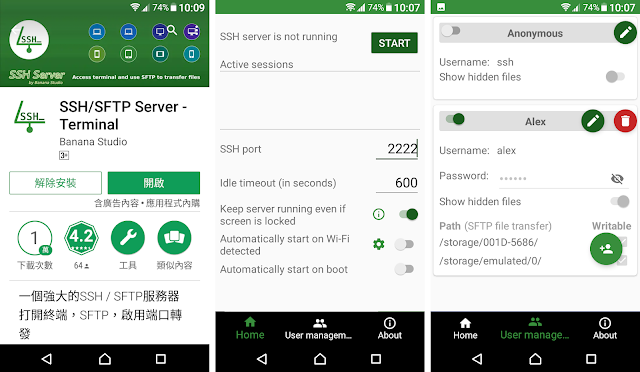
SSH Server SD Card
User 設定那邊加了兩個目錄,一個是 SD 卡的目錄 001D-5686/,一個是手機內部儲存的目錄 0/,SD 卡目錄的名稱是磁碟的序號,是格式化的時候產生的,理論上每張卡都不一樣。
掛載的方式為,先產生兩個目錄,

mkdir myphone/sdcard/
mkdir myphone/sandisk32/

然後再分別掛載上去。
sshfs -o allow_other -o idmap=user -o uid=1000 -o gid=1000 -o reconnect -o compression=no -p2222 alex@192.168.0.8:/0/ myphone/sdcard/
sshfs -o allow_other -o idmap=user -o uid=1000 -o gid=1000 -o reconnect -o compression=no -p2222 alex@192.168.0.8:/001D-5686/ myphone/sandisk32/